Mastering the Art of Eggs: Your Ultimate Guide to Cooking Perfect Eggs Every Time
Eggs are a true culinary chameleon: incredibly versatile, packed with nutrition, and wonderfully delicious. For anyone who loves a good breakfast, seeks a quick and satisfying meal, or simply wants to enhance their cooking repertoire, mastering how to cook eggs is an indispensable skill. With a multitude of preparation methods – from the light and airy scrambled to the classic sunny side up, and all the nuanced “over” variations – there’s an egg style to suit every palate and every occasion.
This ultimate guide is designed to demystify the art of egg cooking. We will walk you through the five most popular and fundamental methods for preparing eggs, providing clear, step-by-step instructions, expert tips, and insights to help you achieve your desired egg consistency every single time. Get ready to transform your morning routine, impress your family and friends, and elevate your egg game to a new level of perfection!
Discover Your Ideal Egg: Exploring Top Cooking Styles
With more than a dozen different methods to cook a simple egg, it’s natural for preferences to vary widely. Perhaps you’re already an expert in your favorite style, or maybe you’re still exploring what truly makes your taste buds sing. Either way, this guide aims to equip you with the knowledge to consistently prepare eggs just the way you like them. We’ll concentrate on the top five most common and beloved frying pan techniques:
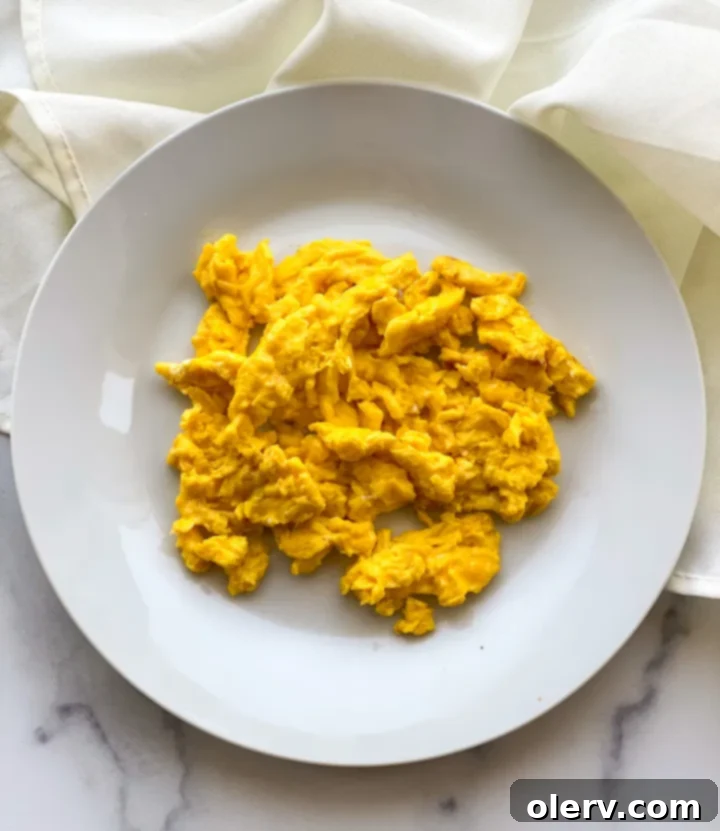
- Scrambled Eggs: The ultimate comfort food, known for its light, fluffy, and creamy texture.
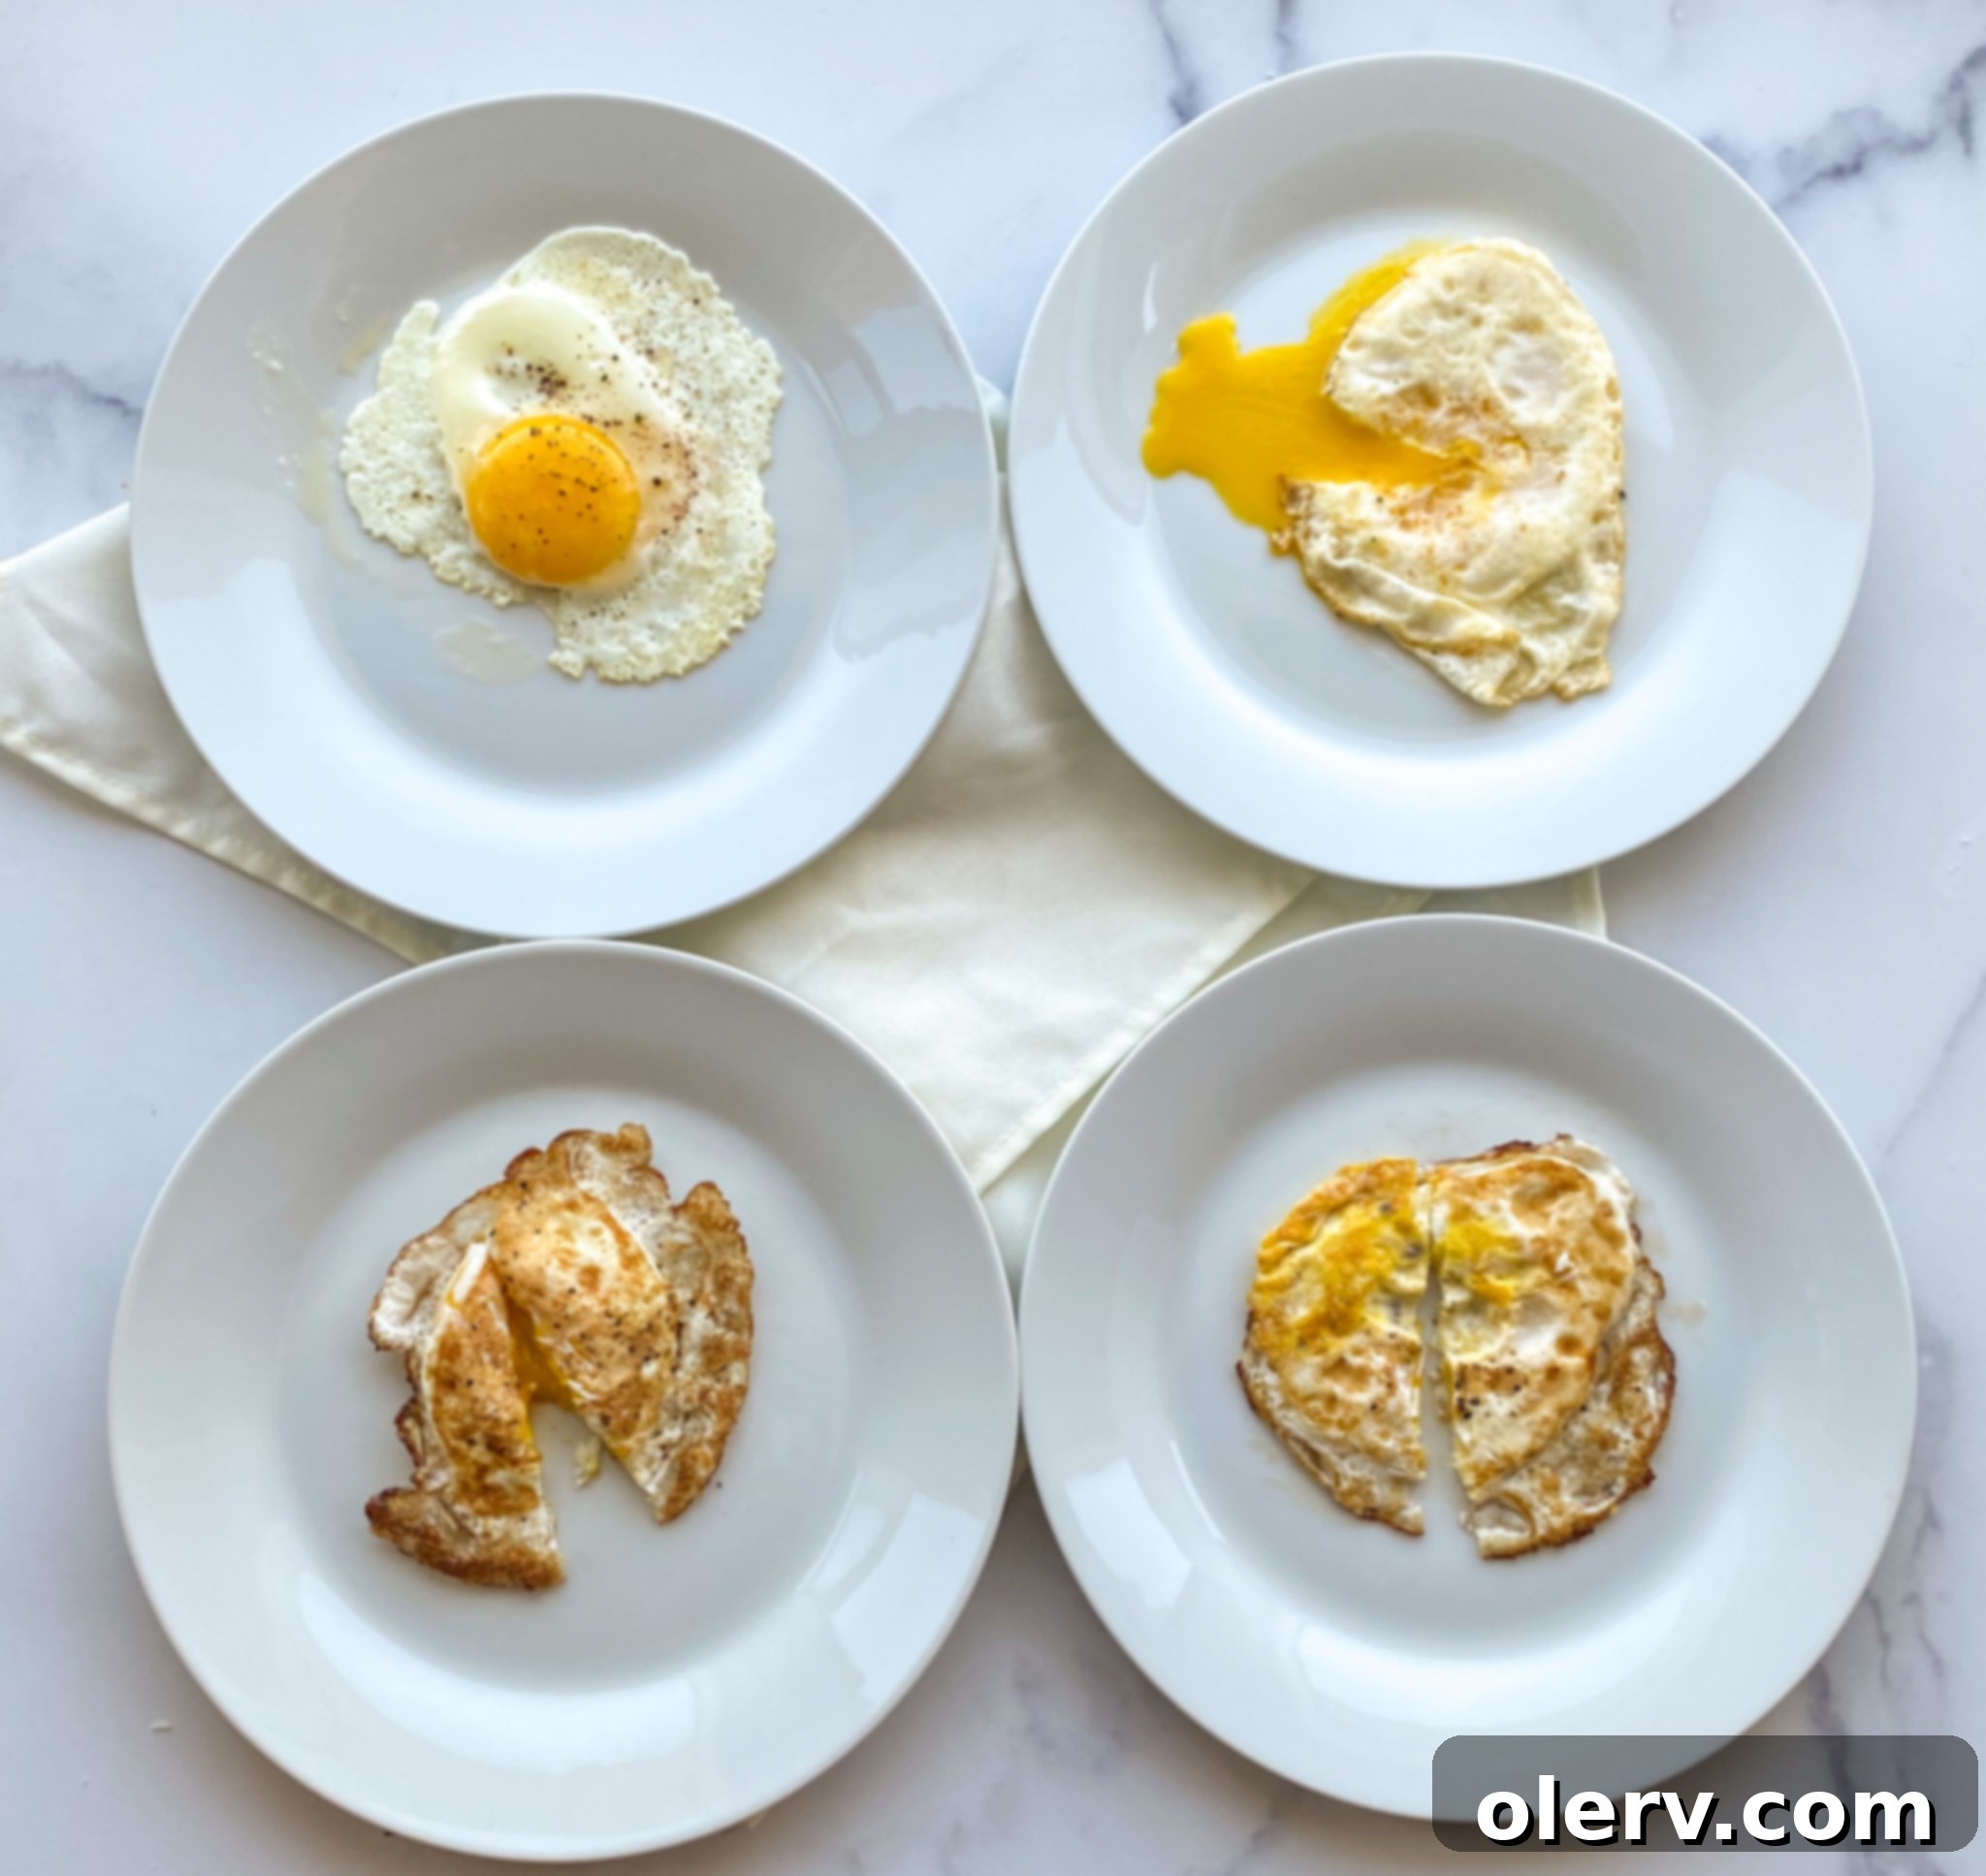
- Sunny Side Up: A visually appealing choice with a perfectly set white and a vibrant, liquid yolk.
- Over Eggs: A versatile category that offers a spectrum of yolk doneness, achieved by flipping the egg.
- Over Easy: Gently flipped for a brief moment, leaving the yolk completely runny.
- Over Medium: Cooked a little longer after flipping, resulting in a velvety, slightly runny yolk.
- Over Hard: Fully cooked on both sides, ensuring a firm, solid yolk.
Essential Tools and Ingredients for Egg Perfection
Before we dive into the specific cooking methods, let’s discuss two fundamental elements that are crucial for achieving consistently excellent egg dishes. These simple yet powerful tips will significantly enhance your results, regardless of the egg style you choose:
- Invest in a High-Quality Nonstick Pan: This isn’t just a recommendation; it’s a game-changer for egg cooking. A good nonstick pan is your most valuable ally, ensuring that your eggs glide effortlessly from the pan to your plate without sticking, tearing, or leaving behind residue. This ease of movement is particularly important for delicate preparations like sunny side up or the various “over” styles, where a clean flip or transfer is key. While it might seem like a small detail, dedicating a specific nonstick pan just for your eggs can make a world of difference in your daily cooking.
- Always Opt for Butter: When it comes to greasing your pan for eggs, ditch the nonstick cooking spray and reach for good old-fashioned butter. Butter doesn’t just prevent sticking; it infuses your eggs with an unparalleled richness and a savory, delightful flavor that cooking sprays simply cannot replicate. Melt the butter gently over medium heat until it fully coats the pan and just begins to foam. This indicates it’s at the perfect temperature to receive your eggs, ensuring they cook evenly and absorb that delicious buttery essence.
With these foundational tips in mind, let’s begin our culinary journey into the wonderful world of perfectly cooked eggs!
1. Achieving Light and Fluffy Scrambled Eggs
Scrambled eggs are a beloved breakfast item, prized for their soft texture and comforting simplicity. The ultimate goal for perfect scrambled eggs is to make them light, airy, and incredibly fluffy – never dry, rubbery, or overcooked. Here are two crucial tips to help you master this classic:
- Aggressive Whisking for Air: Don’t just casually stir your eggs. Whisk them vigorously, almost aggressively, until they transform into a lighter, foamy, airy, and uniform yellow color. This process incorporates vital air into the egg mixture, which is the secret to their eventual fluffy texture. Think of it like creating a delicate foam rather than just mixing liquids.
- The Secret to Creaminess: To add an extra layer of creaminess, body, and a richer depth of flavor, whisk in a small amount of dairy. Whole milk or half-and-half are popular choices, but for an even more luxurious texture, consider adding a tablespoon of Greek yogurt or sour cream per two eggs. These additions contribute fat and moisture, preventing the eggs from becoming dry and enhancing their silky smooth consistency.
How to Perfectly Scramble Eggs: A Step-by-Step Method
- Prepare the Eggs: In a small bowl, whisk your desired number of eggs with your chosen creamy addition (e.g., 1 tablespoon of sour cream per two eggs). Season generously with salt and pepper. Whisk diligently until the mixture is completely smooth, light, and airy.
- Heat the Pan: Melt 1-2 tablespoons of butter (depending on the number of eggs) in your small nonstick pan over medium heat. Swirl the pan to ensure the melted butter thoroughly coats the entire surface. The butter should just begin to foam, indicating it has reached the ideal temperature.
- Add Eggs and Adjust Heat: Pour the whisked egg mixture into the center of the warm pan. Immediately reduce the heat to medium-low. This controlled heat is critical to prevent the eggs from cooking too rapidly and becoming tough.
- Gentle Folding Technique: Allow the eggs to sit undisturbed for a moment, waiting for the edges to just barely start to set. Then, using a heat-resistant rubber spatula, gently push the cooked egg from one side of the pan to the other. Pause between pushes, letting the uncooked liquid egg flow into the newly cleared space to cook. Continue this gentle folding motion, gradually forming large, soft curds. Avoid constant, aggressive stirring, which can break the curds down too finely.
- Watch for Moisture: The key to fluffy scrambled eggs is to remove them from the heat before they are fully dry. They should appear mostly cooked with large, pillowy folds, but still shimmer with a visible amount of moisture. Remember, they will continue to cook slightly from residual heat after being removed from the pan.
- Serve Immediately: At this stage, gently fold the eggs into themselves a couple of times to bring them together. Remove the pan from the heat right away. Transfer your perfectly scrambled eggs to serving plates and enjoy their light, creamy texture while still warm.
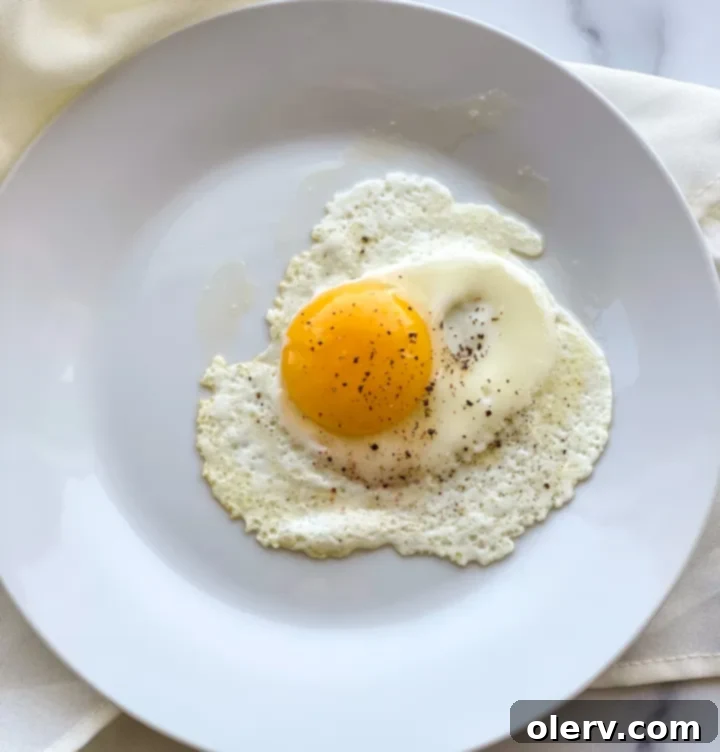
2. Mastering Sunny Side Up Eggs: The Classic Runny Yolk
A sunny side up egg is a delight for both the eyes and the palate – a firm, fully set white surrounding a brilliant, perfectly runny yolk. This style is fried exclusively on one side, ensuring the yolk remains gloriously liquid and bright, making it an excellent choice for dipping toast or adding a rich, natural sauce to any meal. Achieving this delicate balance requires precision and attention to detail.
- The Indispensable Nonstick Pan: As with all fried eggs, a high-quality nonstick pan is absolutely essential for sunny side up eggs. It guarantees that the egg won’t stick, allowing you to easily slide it from the pan directly onto your plate without any risk of breaking the delicate yolk or tearing the pristine whites.
- Strategic Medium Heat: Cooking over consistent medium heat is paramount. This allows the egg whites to set gradually and evenly from the edges inwards, becoming firm and opaque without browning too quickly or becoming crispy. Simultaneously, the yolk retains its beautiful liquid state and vibrant color. High heat can lead to tough, rubbery whites while leaving the surface of the egg undercooked.
How To Make the Perfect Sunny Side Up Eggs
- Prepare the Pan: Heat 1-2 tablespoons of butter in your nonstick skillet over medium heat. Allow the butter to melt completely and lightly foam. Gently tilt and swirl the pan to ensure the melted butter coats the entire cooking surface evenly.
- Add Eggs and Season: Carefully crack your eggs directly into the skillet, ensuring they are spaced apart if you’re cooking more than one. Immediately season the eggs with a pinch of salt and freshly ground black pepper.
- Cook to Visual Perfection: Allow the eggs to cook undisturbed. Observe the whites as they begin to set and turn opaque from the edges towards the center. Continue cooking for approximately 3 to 4 minutes. The goal is for the whites to be fully set around the yolk and slightly opaque on the surface, with no raw, translucent white remaining. Crucially, the yolk must remain completely runny and bright yellow.
- Serve Promptly: Using a thin, flexible spatula, carefully slide the sunny side up eggs from the pan onto your serving plate. Serve them immediately to enjoy that ideal runny yolk, perhaps with a slice of crusty bread or toast for dipping.
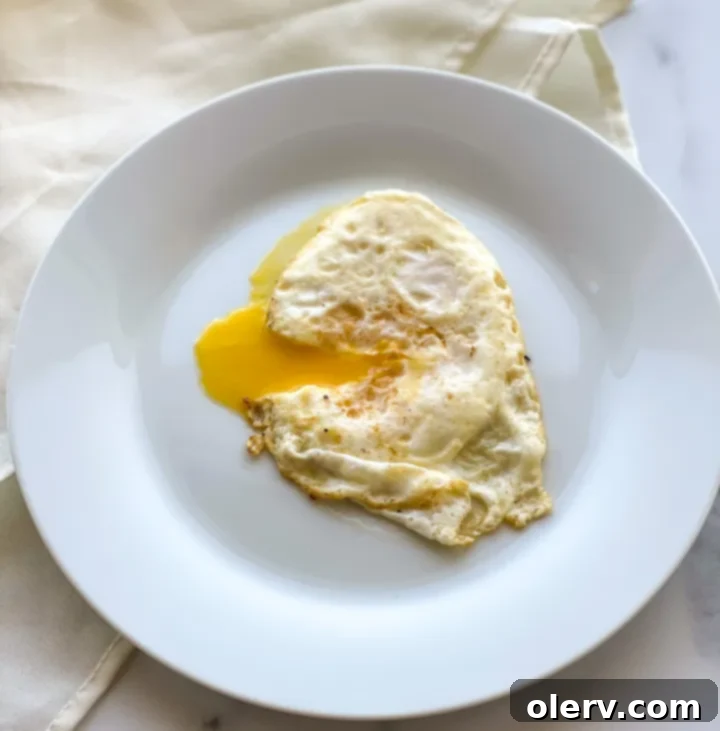
3. Cooking Over Easy Eggs: The Perfect Runny Yolk Flip
For those who adore a runny yolk but prefer their egg flipped, the “over easy” method is an absolute staple. This technique involves frying the egg on both sides, but with a very brief cook time on the second side. This ensures that the yolk remains wonderfully liquid and ready to ooze at the slightest touch. The term “over” simply refers to the action of flipping the egg in the pan, while “easy” denotes the very soft, fluid doneness of the yolk.
How to Make the Perfect Over Easy Eggs
- Prepare the Pan: Begin by heating 1-2 tablespoons of butter in a nonstick skillet over medium heat. Let it melt and lightly foam, then tilt the pan to ensure the melted butter evenly coats the entire cooking surface.
- Initial Cook: Carefully crack your eggs into the skillet and season generously with salt and pepper. Cook for approximately 2 to 3 minutes, or until the whites are mostly set and opaque on top, similar to a sunny side up egg. The yolk should still be completely fluid and glistening.
- The Gentle Flip: This is the most crucial step. Using a thin, wide, and flexible spatula, gently slide it completely underneath the egg. In one swift, confident, yet gentle motion, carefully flip the egg over. Precision is key here to avoid breaking the delicate yolk.
- Second Side Cook: Cook the flipped egg for a very short duration – typically only about 30 seconds to 1 minute. The objective is to just lightly set the top layer of the white and slightly warm the yolk without allowing it to solidify. When you serve it, the yolk should remain beautifully runny and liquid when cut into.
- Serve Immediately: Transfer the over easy eggs immediately to a plate and serve warm. These eggs are absolutely fantastic on toast, as part of a hearty breakfast hash, or perched atop creamy avocado for a satisfying meal.
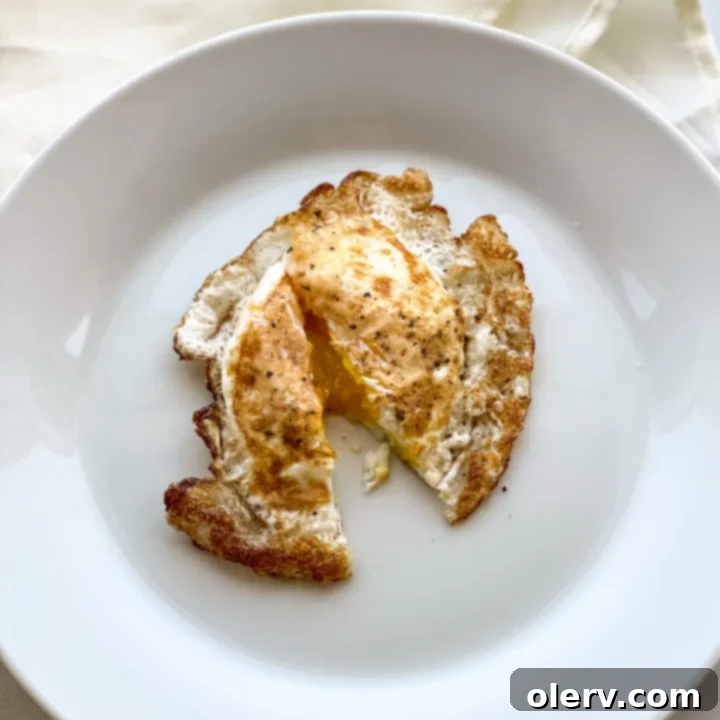
4. Perfecting Over Medium Eggs: The Velvety Yolk
An “over medium” egg strikes a delightful balance, offering a yolk that is no longer completely liquid but boasts a beautifully soft, creamy, and velvety texture. This style is achieved by flipping the egg, similar to an over easy, but cooking it for a slightly longer duration on the second side. The result is a yolk that holds its shape when cut but flows slowly and luxuriantly, providing a richer, almost custard-like experience compared to the fully runny over easy.
How to Make the Perfect Over Medium Eggs
- Prepare the Pan: Heat 1-2 tablespoons of butter in your nonstick skillet over medium heat until it’s lightly foaming. Tilt the pan to ensure the melted butter evenly coats the entire cooking surface.
- Initial Cook: Carefully crack your eggs into the skillet and season with salt and pepper. Cook for approximately 2 to 3 minutes, or until the whites are mostly set on top. The yolk should still be quite liquid at this stage.
- Flip and Cook Further: With your thin, wide spatula, gently slide it under the egg and carefully flip it over. Be mindful not to break the yolk. Cook the flipped egg for about 1 to 1.5 minutes on the second side. This extended cooking time is crucial for allowing the yolk to thicken to that desired velvety, slightly runny consistency.
- Serve Promptly: Transfer the over medium eggs to a plate and serve immediately. These eggs are an excellent choice when you desire a yolk that spreads smoothly without being fully liquid, offering a more substantial yet still tender texture.
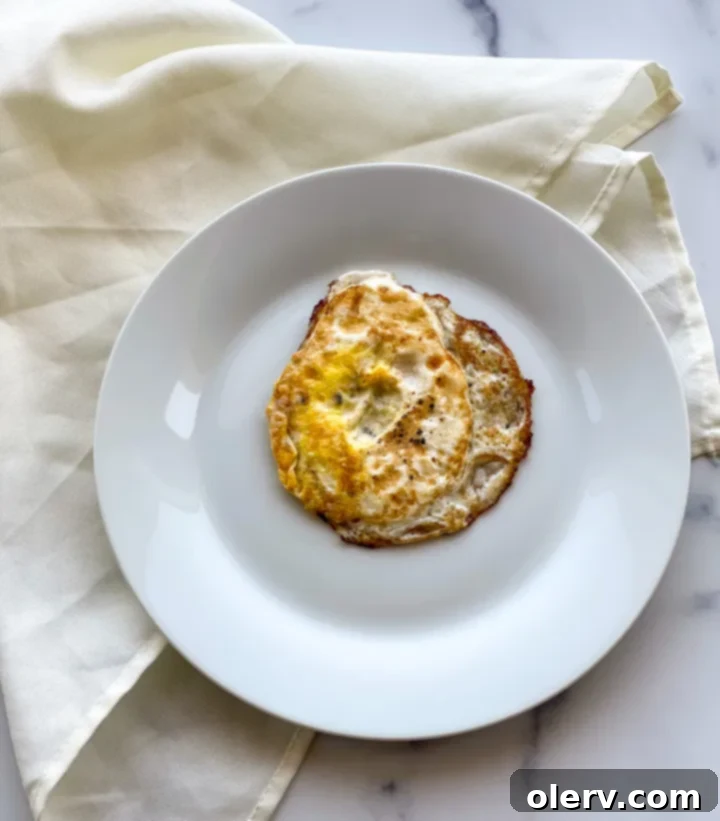
5. Cooking Over Hard Eggs: The Fully Cooked Yolk
For those who prefer their yolks completely set and firm, “over hard” eggs are the ultimate choice. This method involves cooking the egg on both sides for an extended period until the yolk is thoroughly cooked through and solid. These eggs are often simply referred to as “fried eggs over hard.” The primary distinction between over easy, over medium, and over hard eggs lies solely in the duration of cooking after the flip, which dictates the final firmness of the yolk.
How to Make the Perfect Over Hard Eggs
- Prepare the Pan: Heat 1-2 tablespoons of butter in a nonstick skillet over medium heat until it’s lightly foaming. Swirl the pan to ensure the melted butter evenly coats the entire cooking surface.
- Initial Cook and Optional Yolk Break: Carefully crack your eggs into the skillet. For over hard eggs, it’s a common practice to gently break the yolk with the edge of the eggshell or a spatula once it’s in the pan. This step is optional but helps the yolk cook more quickly and uniformly. Season with salt and pepper, and cook for about 2 to 3 minutes, or until the whites are fully set on top.
- Flip and Cook Thoroughly: Using your spatula, gently flip the egg over (or eggs, especially if the yolks were broken and combined). Cook for an additional 2 to 3 minutes on the second side, or until the yolk is entirely cooked through and firm to the touch. You can gently press on the yolk with your spatula to check for firmness – there should be no jiggle or softness.
- Serve: Transfer the over hard eggs to a plate and serve. These are ideal for sandwiches, chopped into salads, or for anyone who prefers a completely solid yolk texture.
Beyond the Pan: Exploring More Egg-cellent Recipes
While this guide has provided a comprehensive overview of the fundamental frying pan methods, the world of egg cooking is incredibly vast and extends far beyond just frying! Eggs are a wonderfully versatile ingredient, forming the foundation of countless dishes enjoyed worldwide. Here are a few other popular and delicious ways to prepare eggs:
- Poached Eggs: Cooked gently in simmering water without their shell, resulting in a delicate, perfectly runny yolk encased in tender, barely set whites. These are ideal for Eggs Benedict, perched atop avocado toast, or served over fresh greens.
- Boiled Eggs (Soft or Hard): Prepared by cooking eggs in their shells in boiling water. Soft-boiled eggs feature a creamy, slightly jammy yolk, perfect for dipping. Hard-boiled eggs, on the other hand, have a firm, fully cooked yolk, making them excellent for salads, deviled eggs, or a convenient grab-and-go snack.
- Omelets: A classic French preparation, an omelet is a delicate, folded egg dish typically filled with a variety of ingredients such as cheese, fresh vegetables, herbs, or cooked meats. The key is a tender, moist interior.
- Frittatas: An Italian open-faced omelet that’s usually started on the stovetop and then finished in the oven. Frittatas are hearty and allow for a wide range of ingredients to be mixed directly into the eggs, making them perfect for using up leftovers or feeding a crowd.
Speaking of hard-boiled eggs, my personal favorite method for achieving consistently perfect, easy-to-peel hard-boiled eggs is by using an Instant Pot! It’s a foolproof way to get fantastic results every single time. You can find my detailed recipe and instructions for Instant Pot Hard-Boiled Eggs right here.
The Nutritional Powerhouse: Why Eggs Are Good for You
Beyond their incredible taste and culinary versatility, eggs are also celebrated as a true nutritional powerhouse. They are an outstanding source of high-quality protein, which is essential for muscle repair, growth, and keeping you feeling full and satisfied throughout the day. Eggs are also brimming with an array of vital vitamins and minerals, including Vitamin D, Vitamin B12, selenium, and choline – a critical nutrient known for supporting brain health, nerve function, and metabolism. Incorporating eggs regularly into your diet is a simple, affordable, and highly effective way to significantly boost your overall nutrient intake and support your health.
Your Journey to Perfect Eggs Begins Now!
Now that you are equipped with the knowledge and techniques for cooking a delectable variety of fried eggs, it’s time to put these skills into practice! Don’t hesitate to experiment with different styles, fine-tune your cooking times, and discover which consistency truly becomes your ultimate preference. Embrace the simple yet profound joy of serving and savoring a perfectly cooked egg, tailored exactly to your liking. Whether you’re a devotee of the luscious runny yolk or prefer a satisfyingly firm, fully cooked one, there’s an egg style perfectly suited for every palate and every meal occasion.
I’m eager to hear from you! What is your absolute favorite way to enjoy eggs? Do you have any secret tips or tricks you’ve discovered along your own culinary journey? Share your thoughts and preferences in the comments below!
Don’t forget to spread the word! Share this comprehensive guide with your friends, family, and fellow food enthusiasts who might also benefit from mastering their egg-cooking skills. And please, leave a comment if you learned something new today or managed to perfect one of these timeless techniques!
XOXO,
Alex Daynes
If you give these recipes a try, please let me know your experience! Leave a comment, rate it, or snap a photo of your perfectly cooked eggs and tag it with @TheAlexDaynes on Instagram! I absolutely love to see what you’ve been cooking, and your creations always make my day!
LOVE THIS RECIPE AND WANT TO SAVE IT FOR LATER? PIN IT TO PINTEREST HERE!
