Easy Holiday Treats: Crafting Delicious Christmas Candies for Festive Fun

The holiday season is a magical time, filled with warmth, joy, and of course, delicious treats! If you’re looking for simple yet spectacular ways to add a touch of homemade charm to your festive celebrations, you’ve come to the right place. These easy holiday treats are not only incredibly fun to make but also serve as wonderful edible gifts, party favors, or delightful additions to your holiday dessert table.
At the heart of these delightful creations is melted white chocolate, a versatile and delicious base that allows your creativity to truly shine. We’re diving into three distinct and adorable Christmas designs today: charming Oreo ornaments, delightful hot chocolate stir sticks, and classic chocolate-covered pretzels. Each recipe is designed to be straightforward, making them perfect for bakers of all skill levels – and especially fun for involving kids and adults alike!
Imagine the smiles these cute treats will bring to your family and friends. Whether you’re hosting a holiday gathering, looking for unique gift ideas, or simply want a fun activity to enjoy with loved ones, these festive candies are sure to be a hit. So, gather your ingredients, unleash your inner pastry artist, and let’s get started on creating some unforgettable holiday memories!

Creating Unforgettable Christmas Candies: Simple & Sweet
This holiday season, why not delight everyone with a homemade touch? These easy holiday treats are designed to be utterly delicious and surprisingly simple to create, making them perfect for your next festive gathering or as thoughtful gifts to share with loved ones. The best part? Each of these treats beautifully utilizes white chocolate melting wafers as their base, allowing for a streamlined preparation process where you can make all three designs in one creative session.
Whether you’re a seasoned baker or just starting out, you’ll find these recipes incredibly accessible. The methods for making these cute Christmas candies are laid out below, along with tips and tricks to ensure your decorating experience is joyful and stress-free. Let’s make this holiday season extra sweet and festive with these delightful homemade treats!

1. Charming Oreo Ornaments: A Festive & Delicious Decoration
These Oreo ornaments are a delightful twist on a classic cookie, transforming them into edible holiday decorations! They’re incredibly popular for their festive look and irresistible taste, making them a perfect addition to any holiday treat platter or as charming gifts. They evoke a sense of nostalgia while offering a burst of holiday cheer with every bite.
What you’ll need:
- 1 package of your favorite Oreos (original or festive red/green cream work wonderfully!)
- 1 bag (approximately 12 oz) high-quality white chocolate melting wafers or candy melts
- Mini unwrapped Reese’s peanut butter cups (these form the “hanger” of your ornament)
- Assortment of festive sprinkles, mini M&Ms, edible glitter, or other decorative candies
- Wax paper or parchment paper for setting
How to Make Oreo Ornaments: Step-by-Step Guide
- **Prepare Your Workspace:** Lay out wax paper or parchment paper on a baking sheet or flat surface. This will prevent your treats from sticking as they set.
- **Melt the White Chocolate:** Place your white chocolate melting wafers in a microwave-safe bowl. Heat in 30-second intervals, stirring well after each interval, until the chocolate is smooth and completely melted. Alternatively, use a double boiler for a more controlled melting process. Ensure no water gets into the chocolate, as this can cause it to seize.
- **Dip the Oreos:** Carefully dip each Oreo cookie into the melted white chocolate, ensuring it’s fully coated. Use a fork or a dipping tool to help lift the cookie, allowing any excess chocolate to drip off.
- **Add the “Hanger”:** Immediately after dipping an Oreo, take a mini unwrapped Reese’s peanut butter cup. Dip the flat bottom of the Reese’s into the melted white chocolate and gently press it onto the top edge of the chocolate-coated Oreo. This will secure it in place and create the illusion of an ornament hanger.
- **Decorate with Holiday Flair:** While the chocolate is still wet, liberally sprinkle your festive candies, M&Ms, or sprinkles over the Oreo. This is where your creativity can truly shine! Experiment with different color combinations and patterns.
- **Allow to Set:** Carefully transfer the decorated Oreo ornaments to your prepared wax paper. Allow them to set completely at room temperature for about 30-60 minutes, or speed up the process by placing them in the refrigerator for 10-15 minutes until the chocolate is firm.
Pro Tip: For an extra special touch, use a toothpick to dab a tiny bit of melted chocolate onto the back of larger individual candies (like M&Ms) before placing them on the Oreo for better adhesion.
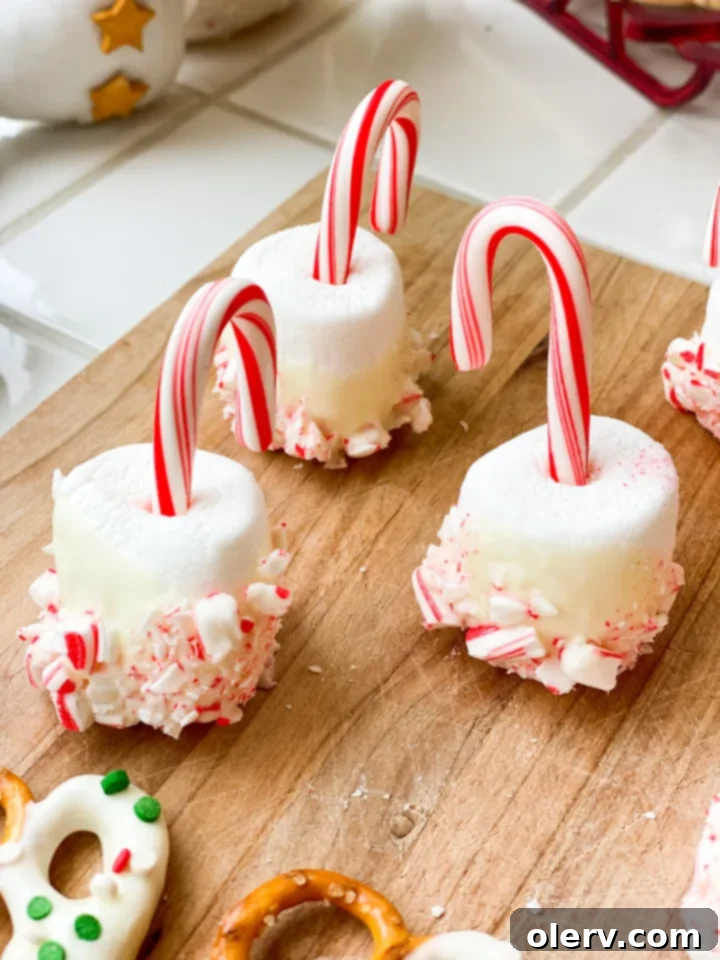
2. Delightful Hot Chocolate Stir Sticks: Elevate Your Winter Drinks
Transform your ordinary hot chocolate into an extraordinary holiday experience with these adorable hot chocolate stir sticks! They’re not just cute; they’re incredibly functional, slowly melting into your warm beverage to add an extra layer of chocolatey goodness and a hint of festive flavor. These make fantastic stocking stuffers or thoughtful small gifts for teachers, neighbors, or colleagues.
What you’ll need:
- Large, fluffy marshmallows (standard or jumbo size work best)
- 1 bag (approximately 12 oz) white or dark chocolate melting wafers/candy melts (choose your preference!)
- Crushed peppermint candies (for that classic holiday minty kick)
- Mini candy canes or festive stir sticks
- Wax paper or parchment paper for setting
How to Make Hot Chocolate Stir Sticks: Easy Steps
- **Prepare Your Toppings:** Crush peppermint candies by placing them in a Ziploc bag and gently tapping with a rolling pin or meat tenderizer until you have fine crumbs. Set aside on a plate.
- **Melt the Chocolate:** Melt your chosen chocolate melting wafers using the microwave method (30-second intervals, stirring) or a double boiler until smooth and lump-free.
- **Insert Stir Sticks:** Gently push a mini candy cane or a decorative stir stick into the center of each large marshmallow. Ensure it’s firmly in place to act as a handle.
- **Dip and Coat:** Hold the marshmallow by its stick and dip it into the melted chocolate, coating the sides and top generously. Allow any excess chocolate to drip back into the bowl. For a cleaner finish, gently wipe the bottom of the marshmallow against the rim of the bowl.
- **Roll in Peppermint:** Immediately after dipping, roll the chocolate-coated marshmallow in the crushed peppermint candies, ensuring an even and generous coating.
- **Allow to Set:** Place the decorated hot chocolate stir sticks upright in a cup or lay them flat on wax paper. Let them set completely at room temperature or in the refrigerator until the chocolate is firm.
Serving Suggestion: Present these stir sticks alongside a mug of hot milk, allowing your guests to stir in the festive chocolate and peppermint goodness themselves. A sprinkle of cocoa powder or mini marshmallows can complete the experience!

3. Classic Chocolate-Covered Pretzels: Sweet & Salty Perfection
A timeless favorite, chocolate-covered pretzels offer that irresistible combination of sweet and salty, making them a universally loved treat. During the holidays, they become even more special with festive decorations. They are incredibly quick to make, allowing you to whip up large batches for parties, gift bags, or simply for snacking.
What you’ll need:
- 1 bag (approximately 12 oz) white chocolate melting wafers or candy melts
- 1 bag of sturdy pretzels (rods or twists work well; choose mini twists for smaller bites)
- Assortment of decorative candies, festive sprinkles, or crushed peppermint (for a variety of looks)
- Wax paper or parchment paper for setting
How to Make Chocolate-Covered Pretzels: Simple Steps
- **Prepare Your Workspace:** Line a baking sheet with wax paper or parchment paper.
- **Melt the Chocolate:** Melt the white chocolate melting wafers in a microwave-safe bowl (30-second intervals, stirring) or using a double boiler until perfectly smooth.
- **Dip the Pretzels:** Dip each pretzel into the melted chocolate. You can coat them fully, or partially dip them to leave some pretzel exposed – both look great! Use a fork or dipping tool to help with this process, allowing excess chocolate to drip off.
- **Decorate Instantly:** While the chocolate is still wet, immediately decorate the pretzels with your chosen sprinkles, crushed peppermint, or other small candies. For a professional look, you can also drizzle them with contrasting melted chocolate (like dark or milk chocolate) after the white chocolate has slightly set but is still tacky.
- **Allow to Set:** Place the decorated chocolate-covered pretzels on the prepared wax paper. Let them set completely at room temperature or in the refrigerator until the chocolate is firm.
General Tips for Working with Melting Chocolate
To ensure your holiday treats look and taste their best, here are a few universal tips for melting and working with chocolate wafers:
- **Low and Slow:** Whether you’re using a microwave or a double boiler, melt chocolate slowly and at a low temperature to prevent burning or seizing.
- **Keep it Dry:** Any contact with water can cause chocolate to seize, turning it thick and crumbly. Ensure all your utensils and bowls are completely dry.
- **Thinning Chocolate (Optional):** If your chocolate seems too thick for dipping, you can add a tiny bit of shortening (like Crisco) or a flavorless oil (like coconut oil) to thin it out slightly. Add a quarter teaspoon at a time and stir until desired consistency is reached.
- **Re-melting:** If your chocolate starts to harden as you work, simply reheat it in 15-second intervals in the microwave, stirring until smooth again.
- **Working in Batches:** If making a large quantity, consider melting chocolate in smaller batches to keep it at an optimal dipping consistency.
Storage and Gifting Your Homemade Holiday Candies
Once your beautiful holiday treats have fully set, proper storage will keep them fresh and delicious. These homemade candies also make fantastic gifts!
- **Storage:** Store your finished treats in an airtight container at room temperature for up to two weeks, or in the refrigerator for extended freshness (especially in warmer climates). Layer them with wax paper to prevent sticking.
- **Gifting Ideas:**
- Clear Treat Bags: Place a few of each treat into clear cellophane bags, tie with a festive ribbon, and add a handmade tag.
- Decorative Tins: Arrange an assortment of treats in a beautiful holiday tin, lined with parchment paper.
- Gift Boxes: Use small gift boxes with tissue paper for a more elegant presentation.
- Hot Chocolate Kits: Pair the hot chocolate stir sticks with a gourmet hot chocolate mix and a festive mug for a complete gift set.
Making these easy holiday treats is more than just baking; it’s about creating joyful experiences and sharing delicious moments. We hope you have as much fun making them as your loved ones will have enjoying them!
If you give this recipe a try, let me know! Leave a comment, rate it, or snap a photo and tag it with @TheAlexDaynes on Instagram! I love to see what you’ve been cooking. It always makes my day!
LIKE THIS RECIPE AND WANT TO SAVE IT FOR LATER? PIN IT TO PINTEREST HERE
Oreo Ornaments

The cutest oreo ornaments! Easy to assemble, and delicious to eat!
5 minutes
5 minutes
Ingredients
- Oreos
- white chocolate melting wafers
- mini unwrapped Reese’s
- sprinkles, m&ms, or decorative candies
Instructions
- Melt the white chocolate down.
- Dip each oreo in the white chocolate to coat it. Then dip each mini Reese’s in the white chocolate and stick it to the top of the oreo
- Decorate the oreo with festive candies and let it set on wax paper.
